
Many folds offer the challenge of dividing the sides of a square into thirds.
Students can be offered this challenge and then asked to compare methods. Images
were made using Paint.
What some origami folders call 'making an S' or simple trial-and-error consists of estimating a third from one side and then dividing the other side, that is, dividing the estimated two-thirds portion, and making a mark. You then fold again from the original side. The new mark generally will be different from the original and represents an improved estimate. One iteration is often sufficient, or you can keep going. The question is why does this work? That is, why do the estimates get better and better? This should be in the reach of students familiar with limits, though I frankly doubt that students who have just studied book procedures can transfer their knowledge to this domain. Instead, I think this exercise can and should be done to provide a basis for future work in limits. This is what educators call scaffolding.
Take a very long strip of paper, perhaps from a roll of wax paper or aluminum foil. Estimate one third of this length and mark the paper (call it A). Now fold from the other side, that is, divide the 'two-thirds' side in half. Make a mark (call it B). Fold from the original end to the new mark (call it A1). If you repeat this procedure, the marks A, A1, A2, etc. should get closer together and approach the real one-third mark. You can measure the edge, either before or after, to ascertain this.
What is happening is that if the original error, the deviation from the one-third point, was E, each fold halves the error. To explain this algebraically, if, starting from one end, the estimated (guessed) one-third point was L/3 + E, then the distance from the other end is L*2/3 -E. (I use the asterisk, *, for times.) Folding the long portion up to the guess is equivalent to dividing that length by 2: (L*2/3-E) * 1/2 is L/3-E/2. That is, this mark is E/2 from the correct position. As you continue doing this, back and forth, each fold improves the estimate by reducing the error by one-half.
Another way of demonstrating this is to take a very long strip of paper, measure the one-third point, and purposely choose a point distinctly different. (Perform the procedure and measure the differences.) It takes two folds, each one halving the error, for each iteration. So if A is E away from the actual point, B will be E/2 off from the desired (2/3) point, A1 will be E/4 away, A2 E/16 away, and so on. It is easy to see that the casual "making an S" method can quickly get to a satisfactory estimate.
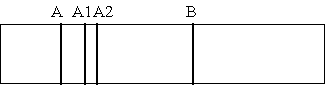
point A side point for this is that my naming scheme of A and B and A1, A2, etc. is arbitrary. It does have some appealing aspects to it, but your students may devise schemes that appeal to them more. In any case, it is important to point out what is arbitrary and what is not. The symbolic or algebraic approach complements the experimental exploration. These different approaches to verifying that the iterative approach works provide different entry points to the topic for the students.
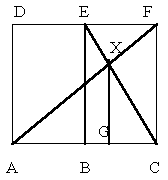
A totally different way of determining a one third mark is to use similar triangles as shown below. Make a diagonal fold (A to F) for the whole square. Fold the square in half, a book fold (B to E). Make a diagonal fold for the half-square. This is fold EC. The point marked G is one-third of the way from C to A since the edge XG is twice CG, because of the similar triangles EBC and XGC. However, XG is equal to AG because of the similar triangles ACF and AGX.
An exercise for the reader (and for your students) is to notice and justify an easy way to mark the other sides of the square once one set of sides has been divided into thirds. Other methods of dividing line segments into specific equal parts exist and are worth studying. The Dollar Bill Rosette features dividing the long sides of a dollar bill into 11ths.