
The business card frog is an action model: it jumps! It is fairly simple
(note the warning given below). The starting sheet of paper should be a
rectangle that is not a square and made of heavier than normal paper, thus, the
business card. This is an excellent fold for students to practice their own
teaching. In addition, the model provides a good start on learning to visualize
what will happen after each fold. The diagrams are made with OrigamiMaker.
The procedure is the following:
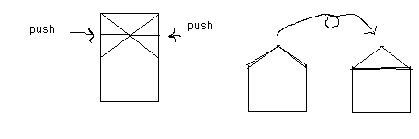
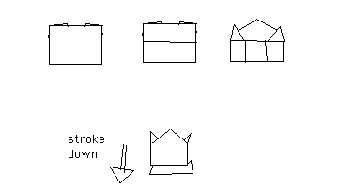
1. Hold the rectangle so a short side is on top. Fold the top diagonally to the side. Unfold and repeat on the other side. Because the material is cardboard, it will be somewhat harder to fold than regular paper. You may need to go over the folds with your thumbnail. What do you see? An answer is an X on the top part of the rectangle.
2. Now turn the model over. Notice that you still have the X but the folds are different. How are they different? Now may be an appropriate time to introduce the origami terminology of valley folds versus mountain folds, OR ask the students for names for describing these folds. Fold the top straight down (parallel) to the ends of the X. You will be making a line through the middle of the X, where the diagonals cross. (Probably more appropriate as a comment at this stage: you can observe that the first folds bisect = dividing the angles into two equal parts.) This last fold is used to divide an area into two equal parts.
3. You have made a little tent. Push the sides in and the card will collapse to form a triangle (arrowhead?). To help your visualization skills, undo this step and imagine in 'your mind's eye' the sides coming in to form a flat arrowhead. Flip the model over.
4. People can make gestures here. The legs of the frog are out. You need to fold them up. This is not an exact fold but what origami folders call 'to taste'.
5. The frog is too fat. How would you make the frog skinny? Make the frog thinner by folding in the sides. You do not have to fold it all the way. However, it is best to make the two sides even.

6. WARNING: the previous folds and most folds in origami should be creased firmly. The next two folds for the frog need to be kept loose. Do not go over the crease to make it flatter. Fold the bottom short end to the nose and then back to the fold just made.
7. Make the frog jump be stroking the back.
What would happen if the original paper was a square? Answer: no body to the frog. You can produce an operational definition of what it means to be a rectangle that is not a square: when you fold one side over to an adjacent side, there is material left over.
How does this work? Answer: the last two folds are the spring. That is why they cannot be too sharp.
Students can experiment with different sizes of paper to see what frogs make the biggest jumps. Hint: different sizes of paper in terms of the two-dimensional area may have the same thickness, the dimension of paper that we generally ignore. This thickness is what holds the energy for the jumping.